Import data
In this section, additional data sets can be loaded into the system for use in the Monitoring or Analysis sections. Using an example set of data, this section will go through the steps of importing data.
The data file being used for this explanation is as shown below
id,survey date,site id,period,location,Dissolved O2,temperature,pH,Turbidity,Elec cond,Latitude,Longitude,River name
1,06/11/2021,9,Survey 5,Cutato ,78.96,26.94,10.01,2.32,73.24,-14.37521944,16.48761667,Cutato
2,07/11/2021,4,Survey 5,Cubango Bridge ,,26.92 degC,10.35,4.11,79.52,-14.46693056,16.27470278,Cubango
3,07/11/2021,5,Survey 5,Cubango River ,99.5,28.33 degC,10.2,3.92,78.86,-14.6311,16.49514167,Cubango
4,06/11/2021,6,Survey 5,Cuchi,97.82,26.93,8.41,1.64,78.74,-14.65584444,16.90379167,Cuchi
5,09/11/2021,7,Survey 5,Cuebe,98.29,26.42,6.92,,19.89,-14.77958333,17.69096667,Cuebe
6,08/11/2021,8,Survey 5,Cuito Cuanavale,79.41,28.54,7.08,9.14,10.13,-15.17034722,19.16834167,Cuito
7,09/11/2021,3,Survey 5,Caiundo Bridge ,92.4,27.1,7.83,20.05,66.88,-15.68565556,17.46622222,Cubango
8,11/11/2021,11,Survey 5,Nkurenkuru,98.55,26.99,8.06,3.16,50.84,-17.10695833,18.10448611,Cubango
9,12/11/2021,12,Survey 5,Rundu,7.76,27.77,8.16,3.03,63.01,-17.91001786,19.75130418,Cubango
10,12/11/2021,1,Survey 5,Andara,99.43,28.83,7.65,10.74,24.45,-18.05260583,21.44805833,Cubango
11,12/11/2021,10,Survey 5,Mohembo,103.45,27.05,7.61,26.08,37.13,-18.28763889,21.79023611,Cubango
12,12/11/2021,13,Survey 5,Shakawe,107.9,28.6,7.85,21.43,37.36,-18.41505,21.88776944,Cubango
13,14/11/2021,2,Survey 5,Boro,54.7,27.87,6.33,2.46,208.07,-19.50458056,23.23403611,Okavango
It is a list of summarised data from a monitoring station survey. The data can either be imported into a new table, or into an existing table.
Import into a new table
Steps are as follows
- Select the Survey under which the data is to be imported from the drop down list
- Choose Add New Table
- Give the new table a name. This should be all in lower case and with no special characters. For example: water_quality_summary
- Choose the file by clicking the Choose File button and browsing to the file location
- Click the Load Data button, and a table showing some information in the file will be shown
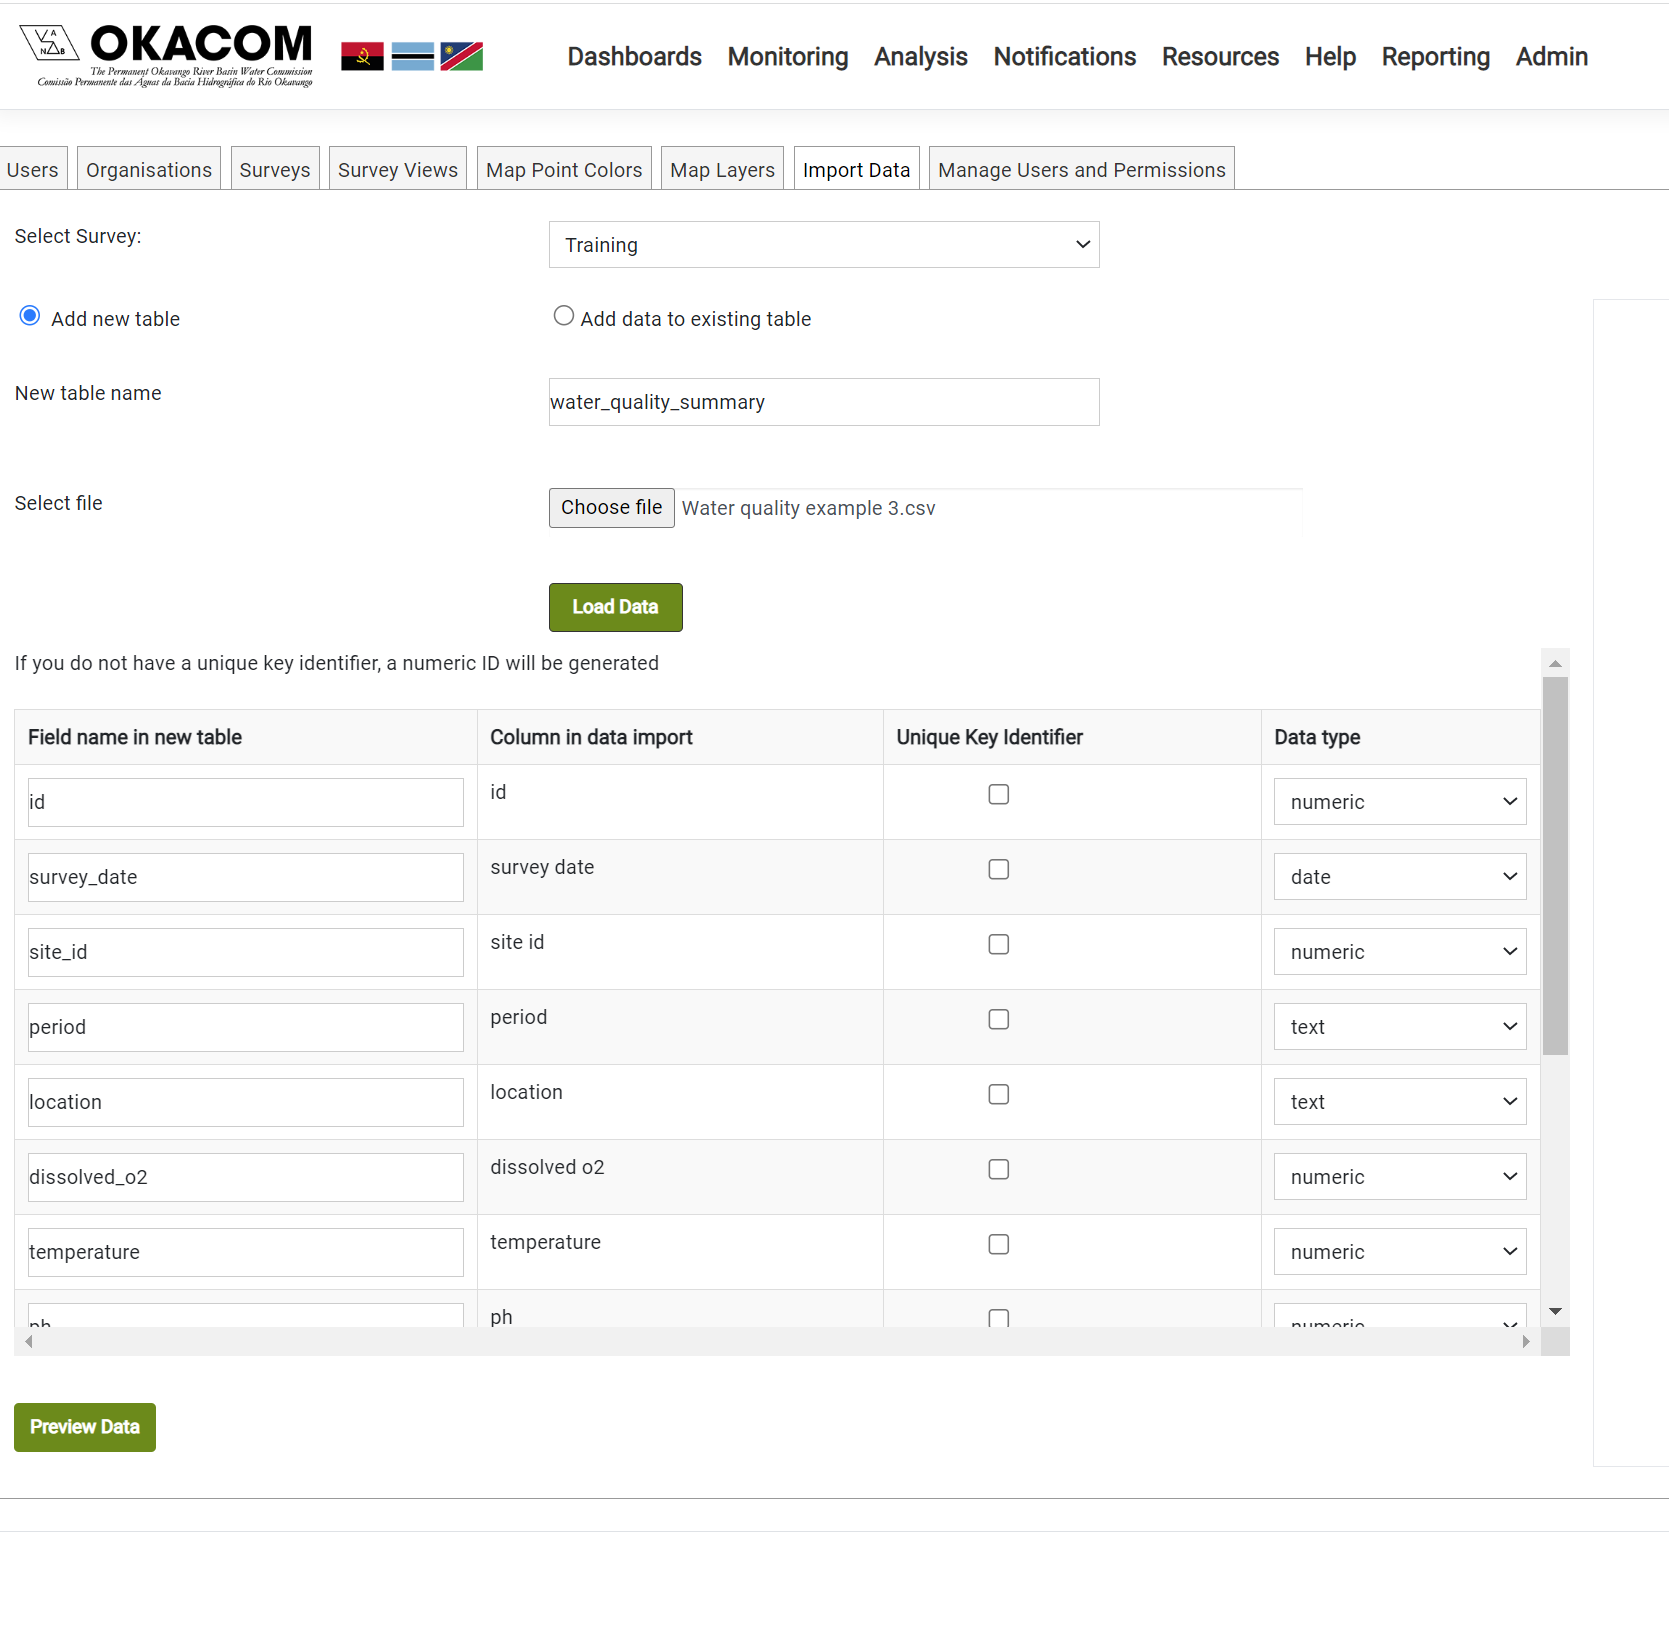
- The application automatically reads the top line of the file to get the column names in the original data, and suggests a name for the column in the table in the database.
- If the data set already has a unique key id, check the box in the Unique Key Identifier column of the grid. If this is not done, the application will generate its own primary key
- Check each of the data types in the Data Type Column, and update them if they are not correct
- Click the Preview Data button
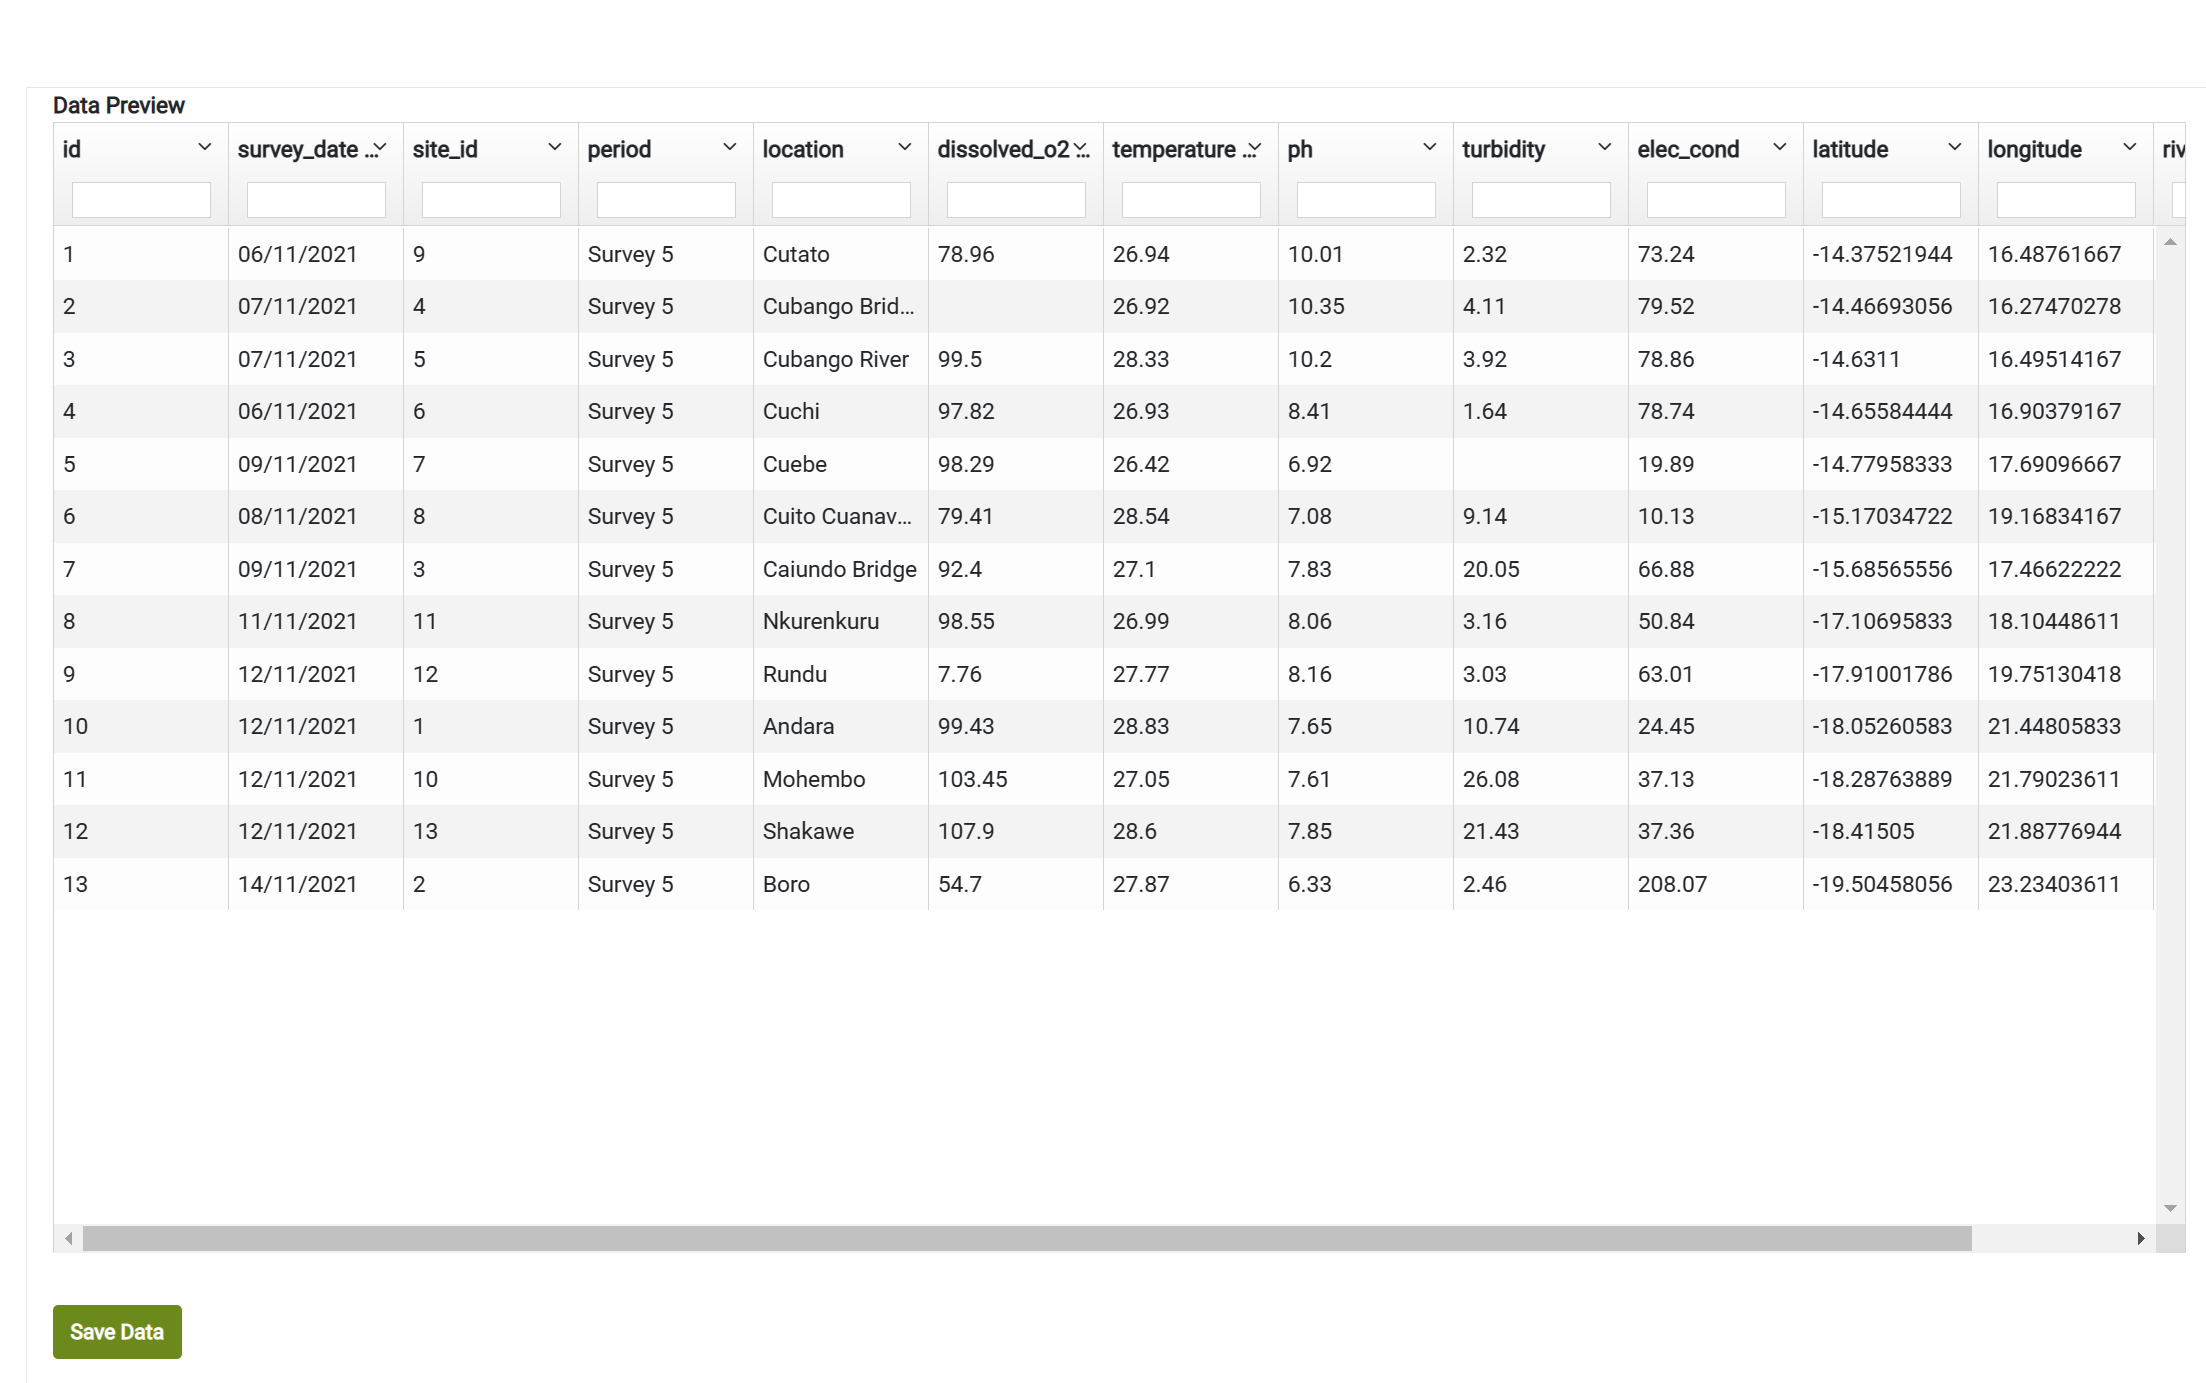
- This will show a screen as illustrated below with a preview of the data with errors highlighted. The example shows no errors. Notice that in the field names, spaces have been replaced by the underscore character
Common errors are usually to do with:
- date formats. Although the importer tries to interpret the date correctly, and has done so in this case, it is generally good practice to have the datas in the format yyyy-mm-dd
- text is a column that has a type numeric.
This data needs to be corrected
- If you do get errors, you will need to correct the data in the csv file and re-import the dta
- Click the Save Data button and the data will be saved to the database with application providing a summary of the number of rows. Should there be errors a detailed error message will indicate where the problem lies.
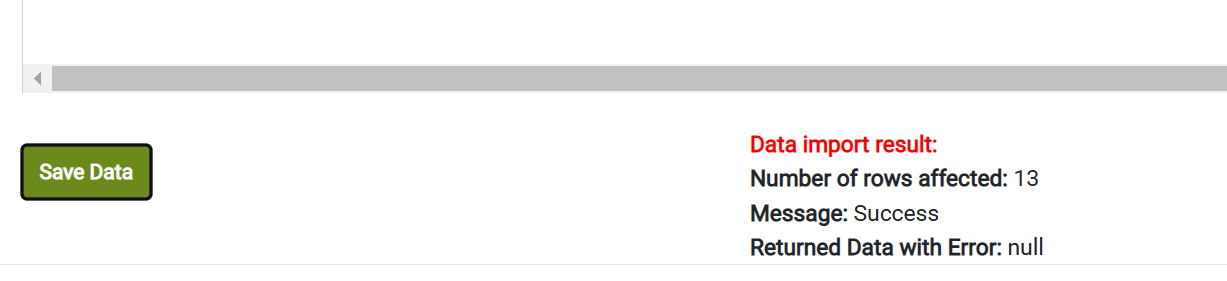
- The data will now be available to set up using an automatically created view with the name vw_[new_table-name]
Importing new data into an existing table
The steps for importing data into an existing table are similar. They are:
- Select the Survey under which the data is to be imported from the drop down list
- Select Add Data to an existing table
- Select the Table from the list
- Chose the file to upload
- Load the data
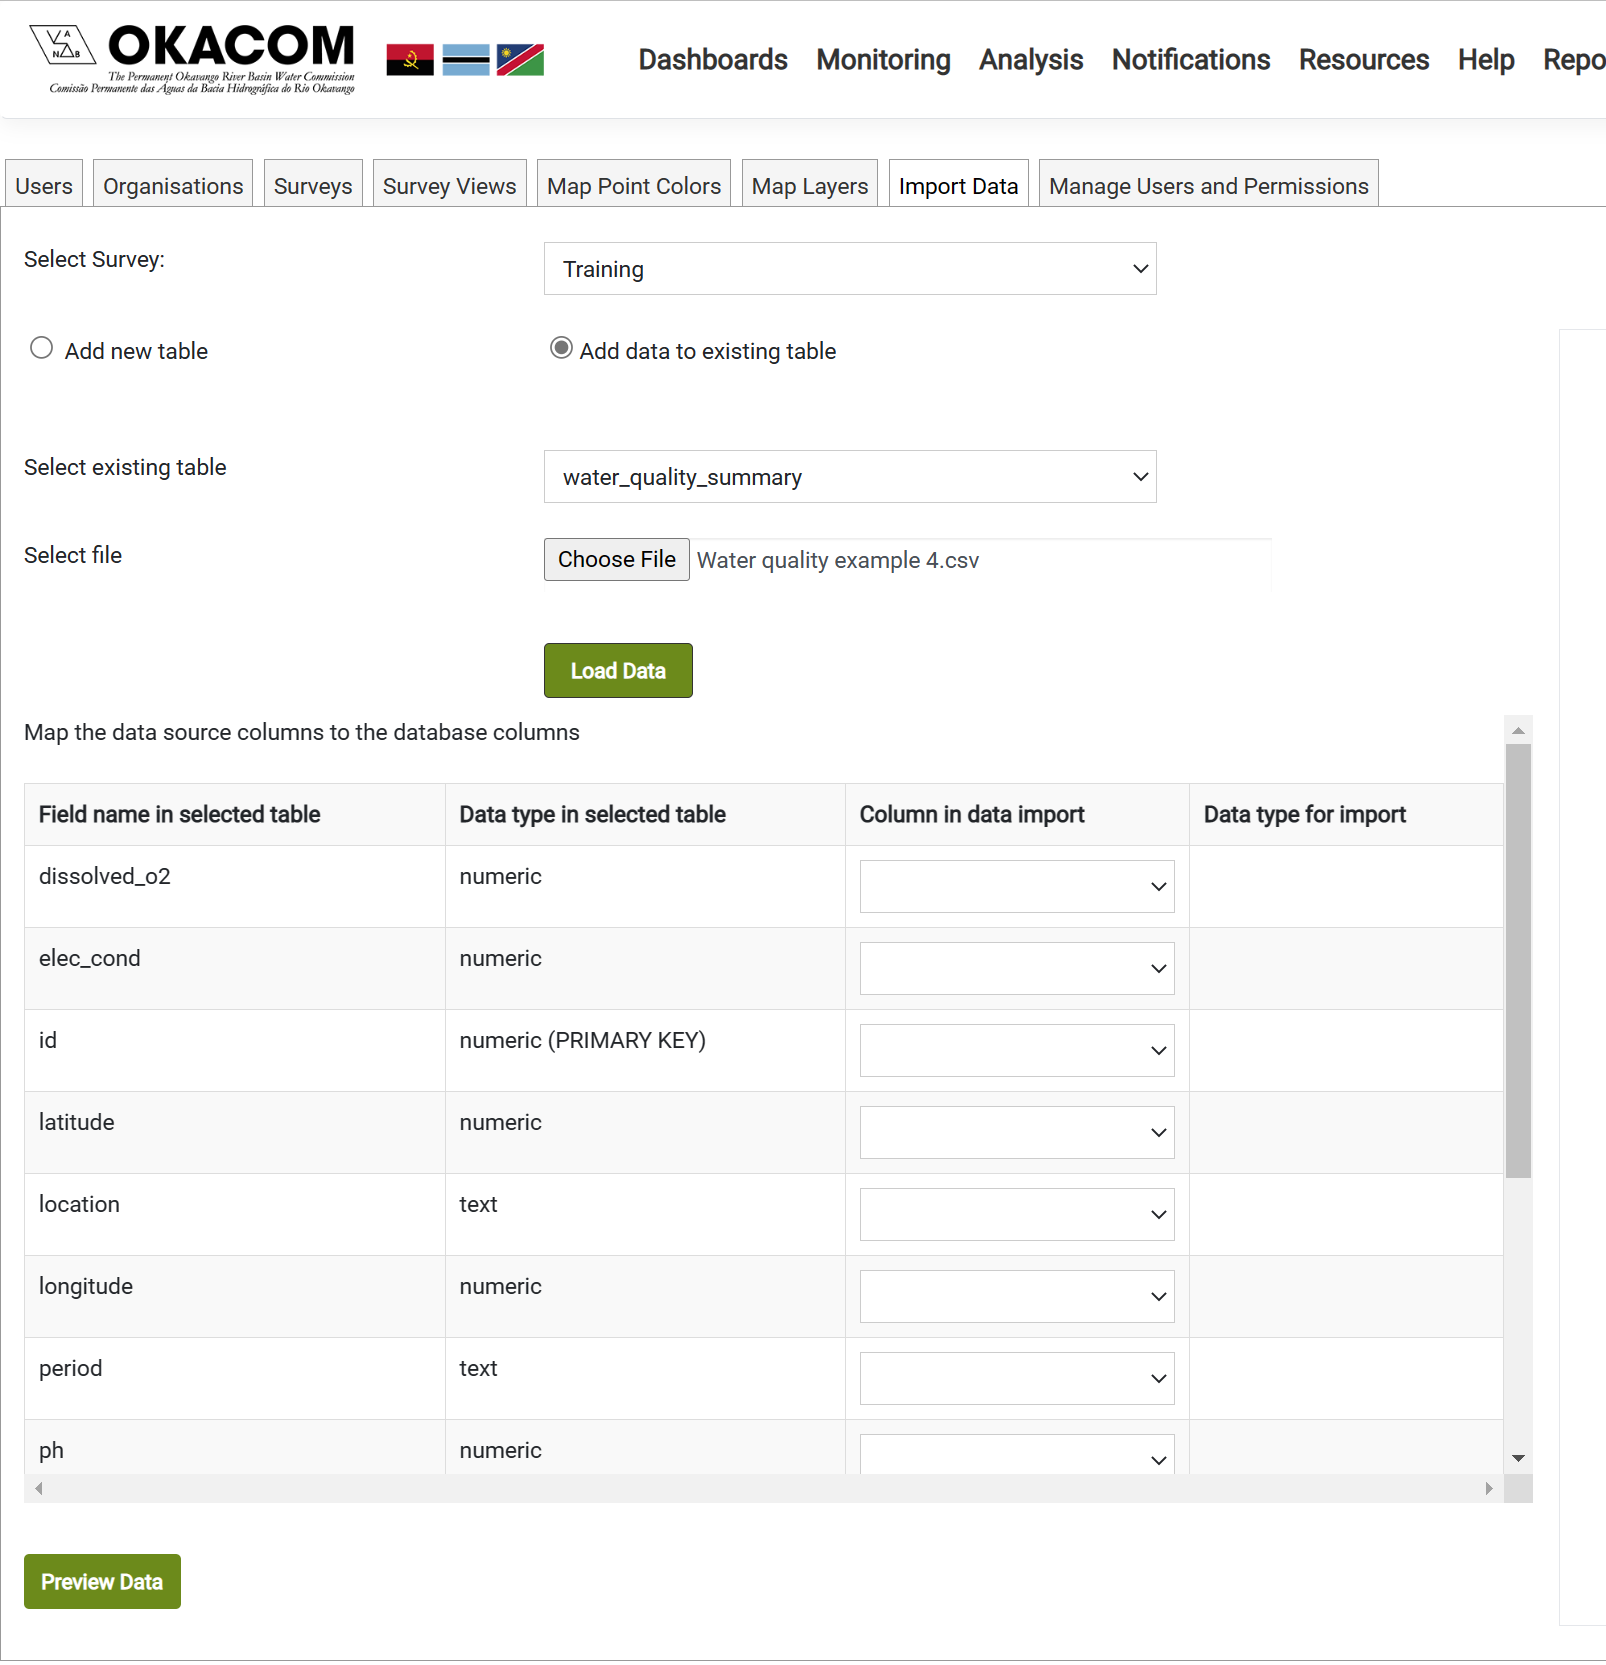
- In this case the table field names are already defined with their types. In the column in the grid headed Column in data import, map each of the columns to a field in the table and click Preview data
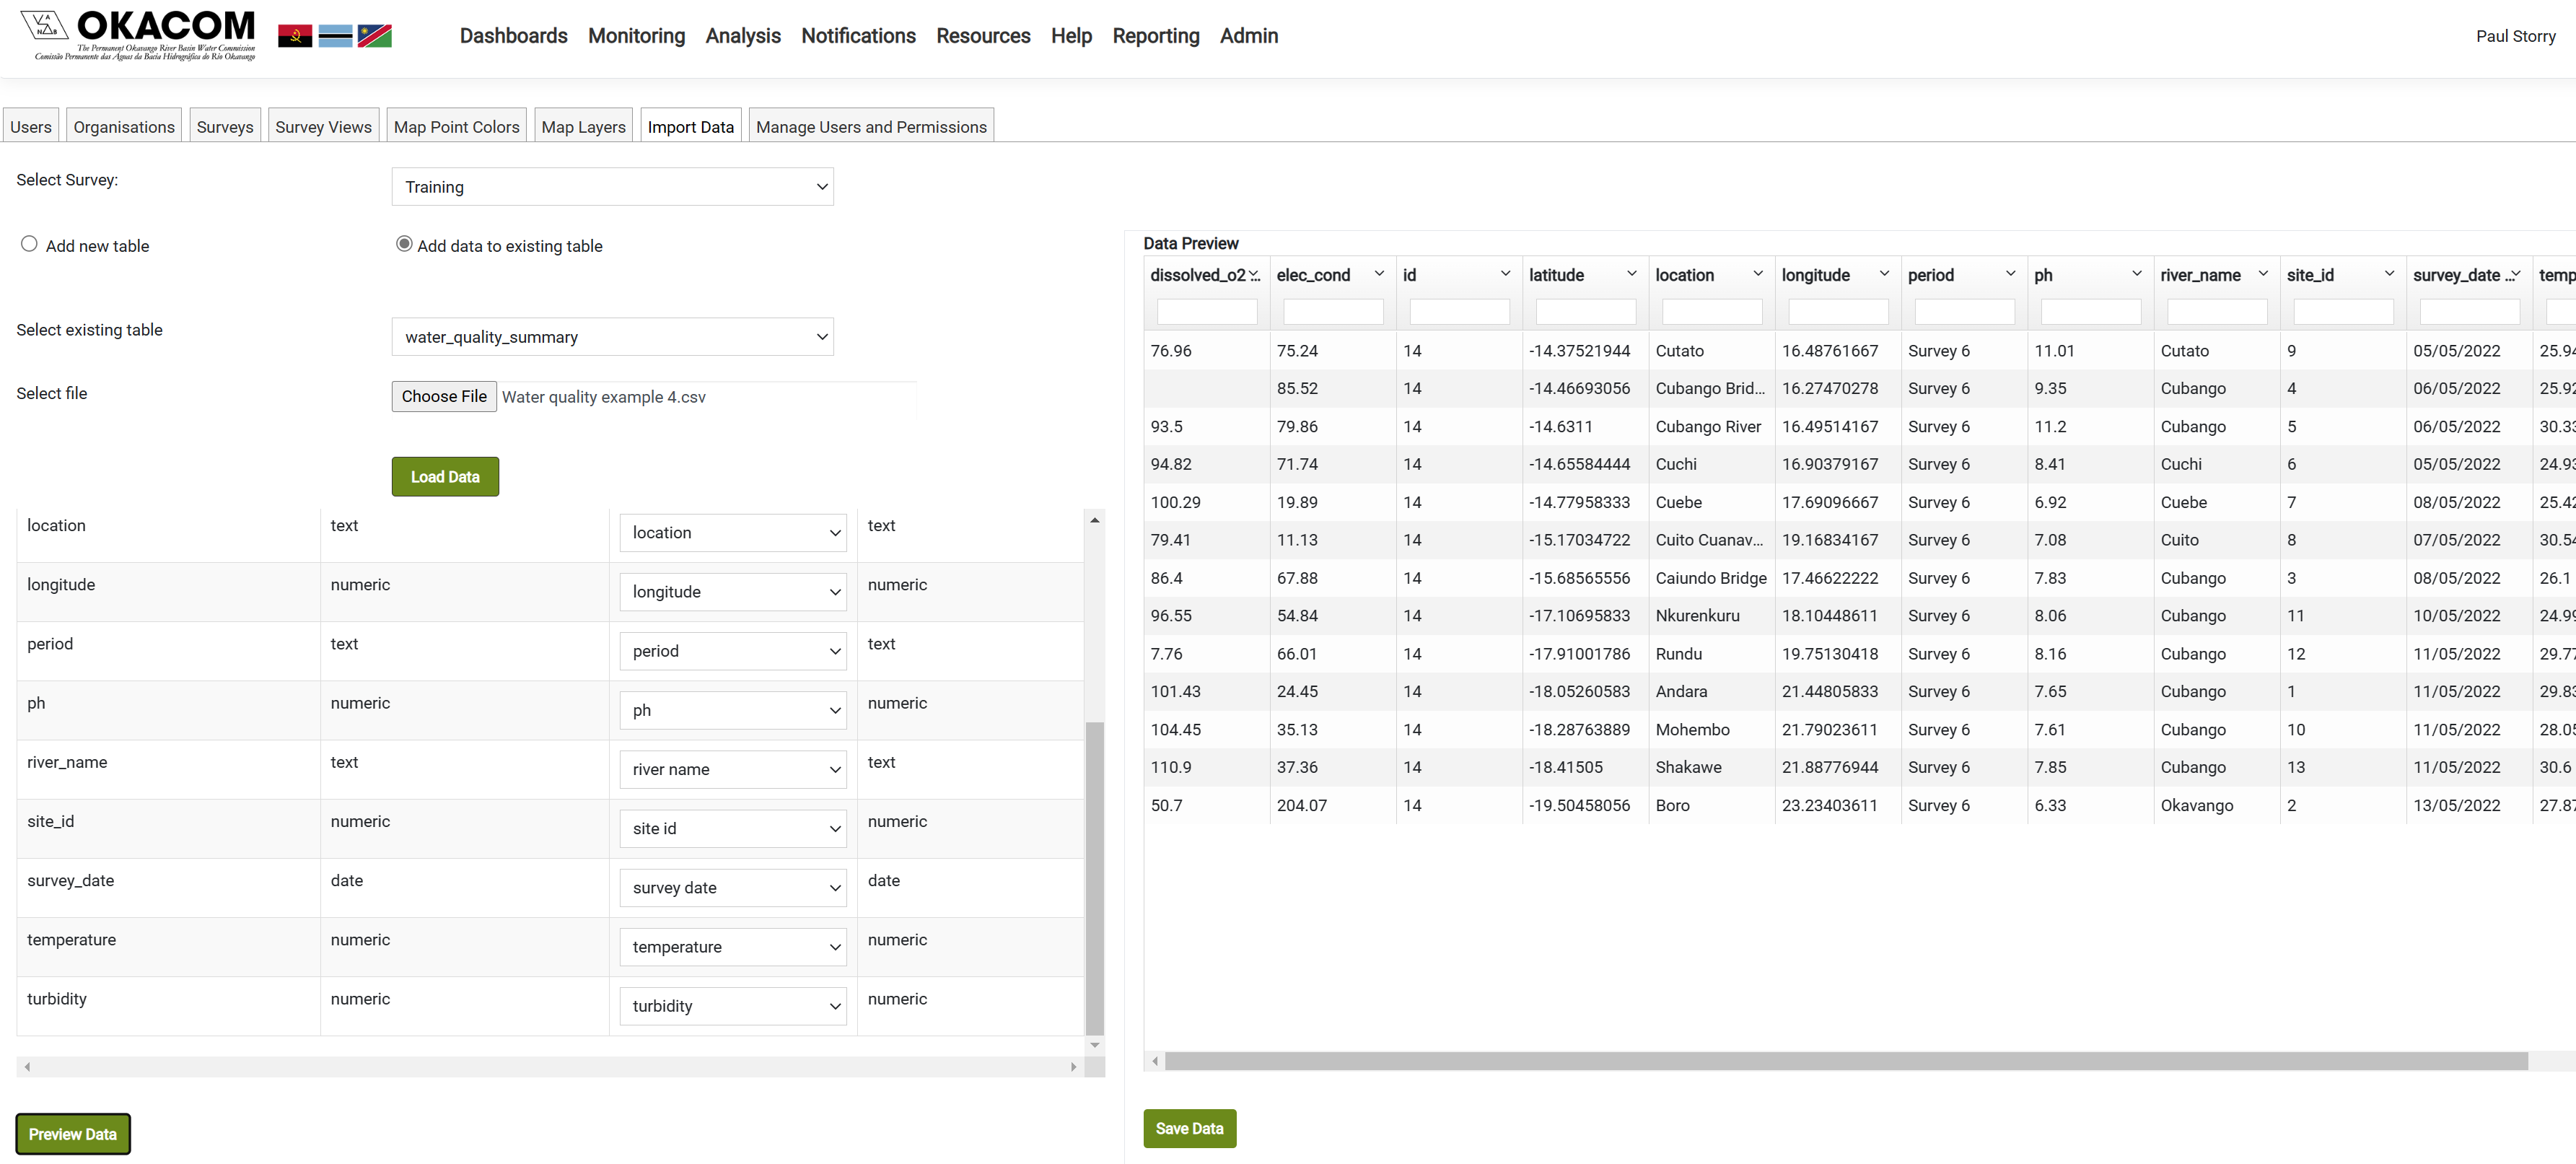
- There after the steps are the same as above
Created with the Personal Edition of HelpNDoc: News and information about help authoring tools and software